There’s a ton of articles out there about starting a blog, but unfortunately they all pretty much re-hash the same story of how to get a blog started. If you really want to be a blogger, it’s important to get the whole picture so you understand all the components to making it work.
In this article, I clarify all the parts of the picture, and in my own unique style, I use a common analogy to make it easy to understand… even if you have never been in a business before.
I’m giving you 5 things you need to know and consider before you dive in. I’m not discouraging you, I’m preparing you.
Let’s get started!
Making money blogging takes more than just starting a blog
I get that you know this, but are you aware of what it’s going to take once your blog is started? You need the bigger picture.
Getting a blog started without the bigger picture is like opening a store without products to sell.
You see, if you want to make money blogging, you have to see it as a business (which it is).
There is more to a retail business than opening an (empty) store, and in like manner, there’s more to blogging than starting a blog without useful content.
Don’t get me wrong, it’s important to start your blog the right way, but you are putting the horse before the cart if you don’t first make a plan – at least a basic plan. You need to know what needs to happen from A to Z.
Does this make sense? Here’s your basic plan…
Let’s go back to the retail store analogy.
Because you have shopped at stores, and have been exposed to them your entire life, it’s easy to understand that a store must have a stock of inventory (products), a market (people who want those products), and customers (people actually coming in to your store).
In like manner, your blog must have content (similar to a store’s inventory), a market (people looking for that type of content), and an audience (people visiting your website).
This is a broader view of your blog and blogging business that is essential to understand before you get started. Blogging is not a get-rich-quick scheme, and you are not going to just launch a blog and start making money.
It doesn’t work that way… it doesn’t work that way for a retail store, or a blog. I blog is a real business.
Now, there are differences.
For instance, in a retail store, people can see and touch the merchandise, and they can talk with the owner or sales people. This tactile approach can build trust and make a customer feel good about making a purchase.
Your blog is different because it is online.
Your online business does not provide the ability for people to talk to you directly, and see your facial expressions, nor does it provide the tangible presence that makes people feel comfortable.
As a blog owner, you need to develop trust in a different way. This makes an online business different. People don’t generally visit a blog and make a purchase the first time, they must trust you first – even before they click on an affiliate link (they need to trust your recommendation of that product).
Is this starting to build a clearer picture of your future blog?
It’s a lot easier to go from step to step in your blogging journey when you know what those steps are before you begin. Otherwise, each next step can feel like an unexpected learning curve and expense. No wonder most bloggers give up or fail.
I want to share with you the steps:
- Start your blog (this is the part you’ve heard about)
- Create content… lots of it in most cases
- Drive traffic to your blog… this can take time, and it’s important to get started
- Monetize your blog… prepare your blog to make money by helping your audience
- Operate your blog… creating more content, and driving more traffic
Loosely speaking, these are the 5 steps. There are other activities in between as well, such as list building, which is part of steps 3 and 4.
>> If you are more comfortable taking a course >>
This is not unlike a retail store, and I’ll analogize again to clarify what I am saying:
- Starting a blog is like physically opening your retail store (although with no products)
- Creating content is like stocking the shelves of your store
- Driving traffic is like putting ads on the radio and in the newspaper to advertise and bring customers to your store
- Monetizing your blog is like having sales people in your store
- Operating your blog is like managing your employees, re-ordering merchandise, paying the rent and utilities, finding new products to sell, etc.
As long as you understand that a blog is a business, it would also be easy to understand why a blog can be so much more desirable than opening a retail store.
- Your blog can sell 24/7 without any staff; a retail store must be open to make a sale
- Your blog has very low operating expenses; with a retail store, you must pay rent, security, decorating, inventory, and staff – all before ever making your first sale (that’s nuts!)
Now here’s the best part…
Starting a blog is a lot of work up front, but minimal work once it’s running. That’s awesome, because that means you can live the life you always wanted and have the freedom to do as you please! You can even run your blog from anywhere in the world while you travel. You certainly can’t do that with a retail store!
Blogging is a front-loaded business, and while that may sound daunting in the beginning, it is what makes it so amazing. You WILL work hard to get your blog operating properly, but a few months of hard work can pay off for many, many years.
So get that… I’m giving you the real news… it’s what you need to hear, not necessarily what you want to hear. And I’m here to help you!
Getting Your Blog Started
Now that you know what it takes, are you ready to change your life?
Starting a blog is not a big deal. I’m going to go through the steps with you. I won’t waste your time with all the details, but I will point out the details you need to know.
Here’s the details that you need to know. I am going to make heads and tails of it right now, and then show you, step by step, how to get your blog up and running right now (yes, right now… it can take under 20 minutes).
A blog is very inexpensive to get started, but it is important to start it the right way. After all, you wouldn’t want to cut expenses and start a retail store the wrong way either. Even the best store won’t do well in the wrong location.
Your blog has to exist somewhere.
I am not going to go into detail here. Just understand that you blog needs a host (that is where it exists) the same way your phone needs a carrier. Does that make sense?
There are generally two ways to host; a paid host (otherwise known as “self-hosted”) or a free host. For a money making blog, I only recommend using a paid host. I promised I won’t go into detail, but if you want to know why, read my post 7 reasons to self-host your blog.
Choosing a host is the next part. I am not going to go into detail here either. I recommend and use Bluehost. Bluehost is designed for bloggers, and is a WordPress approved partner. All my blogs and niche websites are hosted on Bluehost.
I want to be clear that there are other good hosts out there. I’ve used several before switching to Bluehost. You can choose whichever host you want, just be sure to choose to have a “self-hosted” blog as mentioned above.
And you’ve probably heard the term “WordPress” as well. Just to let you know, a self-hosted blog is a WordPress.org blog. That’s the one that gives you total freedom and control. If you want to know more about that, read my post WordPress.org vs. WordPress.com.
How to Start Your Blog
This is my step-by-step tutorial for starting your blog. Please note that I wrote these steps and captured the images as I went through my own account. Therefore, these instructions are exactly what to do to set up an account and start a blog on Bluehost, the host I use. If you choose some other host, the process will be similar but the steps and the images won't be the same.
If you do want to start your blog with Bluehost, they are offering a discount to my readers through my link. Click here to get started with Bluehost and follow along.
Here are the steps you need to take. It may seem like a lot, but it's not. This post seems long only because of all the images I provided to make it easy for you to follow. You can be up and running in under 20 minutes. Let's get started. If you have any questions, ask me in the comments below.
Here’s what we are about to do:
- Choose a hosting plan
- Get a domain name for your blog
- Create your hosting account
- Create your blog
- Set your link structure
That's all you need to create your blog (that's the first part of your blogging business as explained above). Once your blog is created, you can begin blogging (adding content). Remember, I am here with you today and beyond.
So let’s begin!
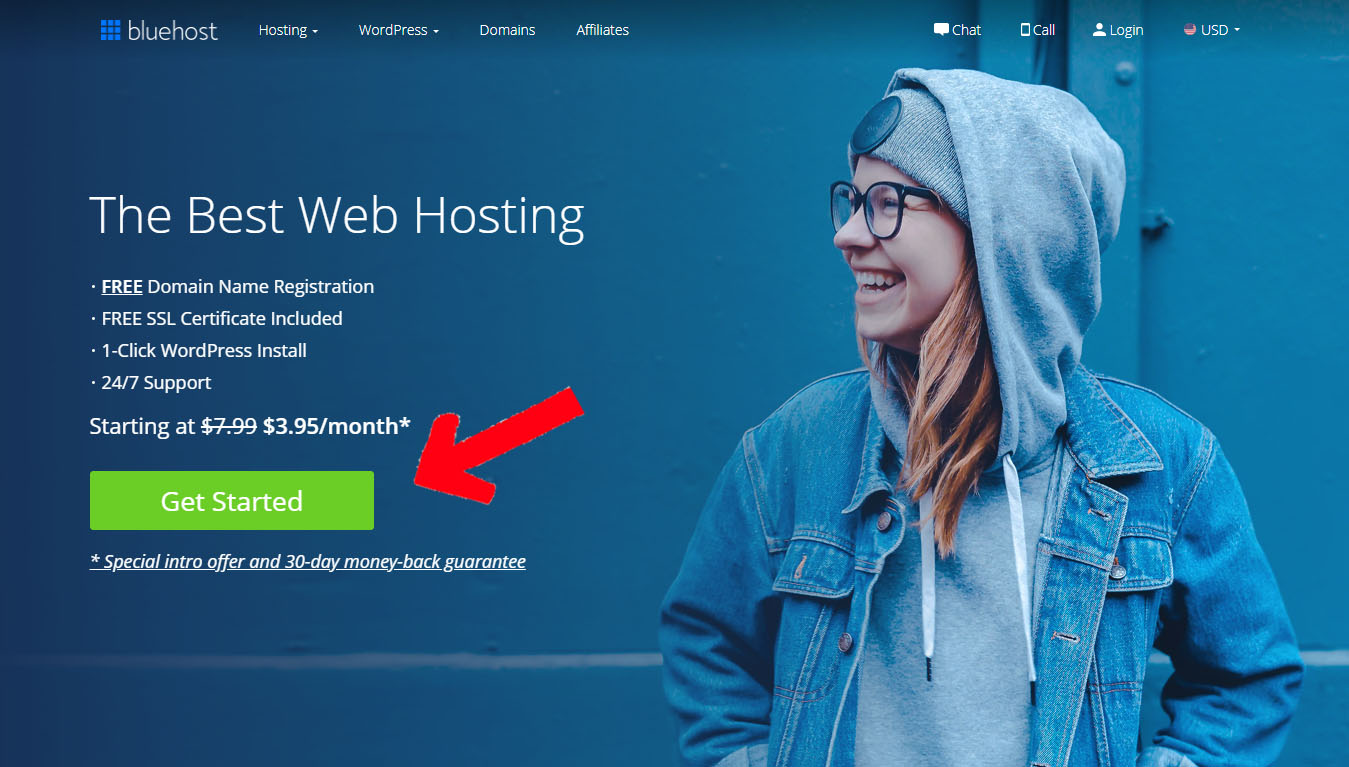
When you click to open your Bluehost account, this is the first screen you will see. Once on this screen, click "Get Started".
1. Choose your hosting plan
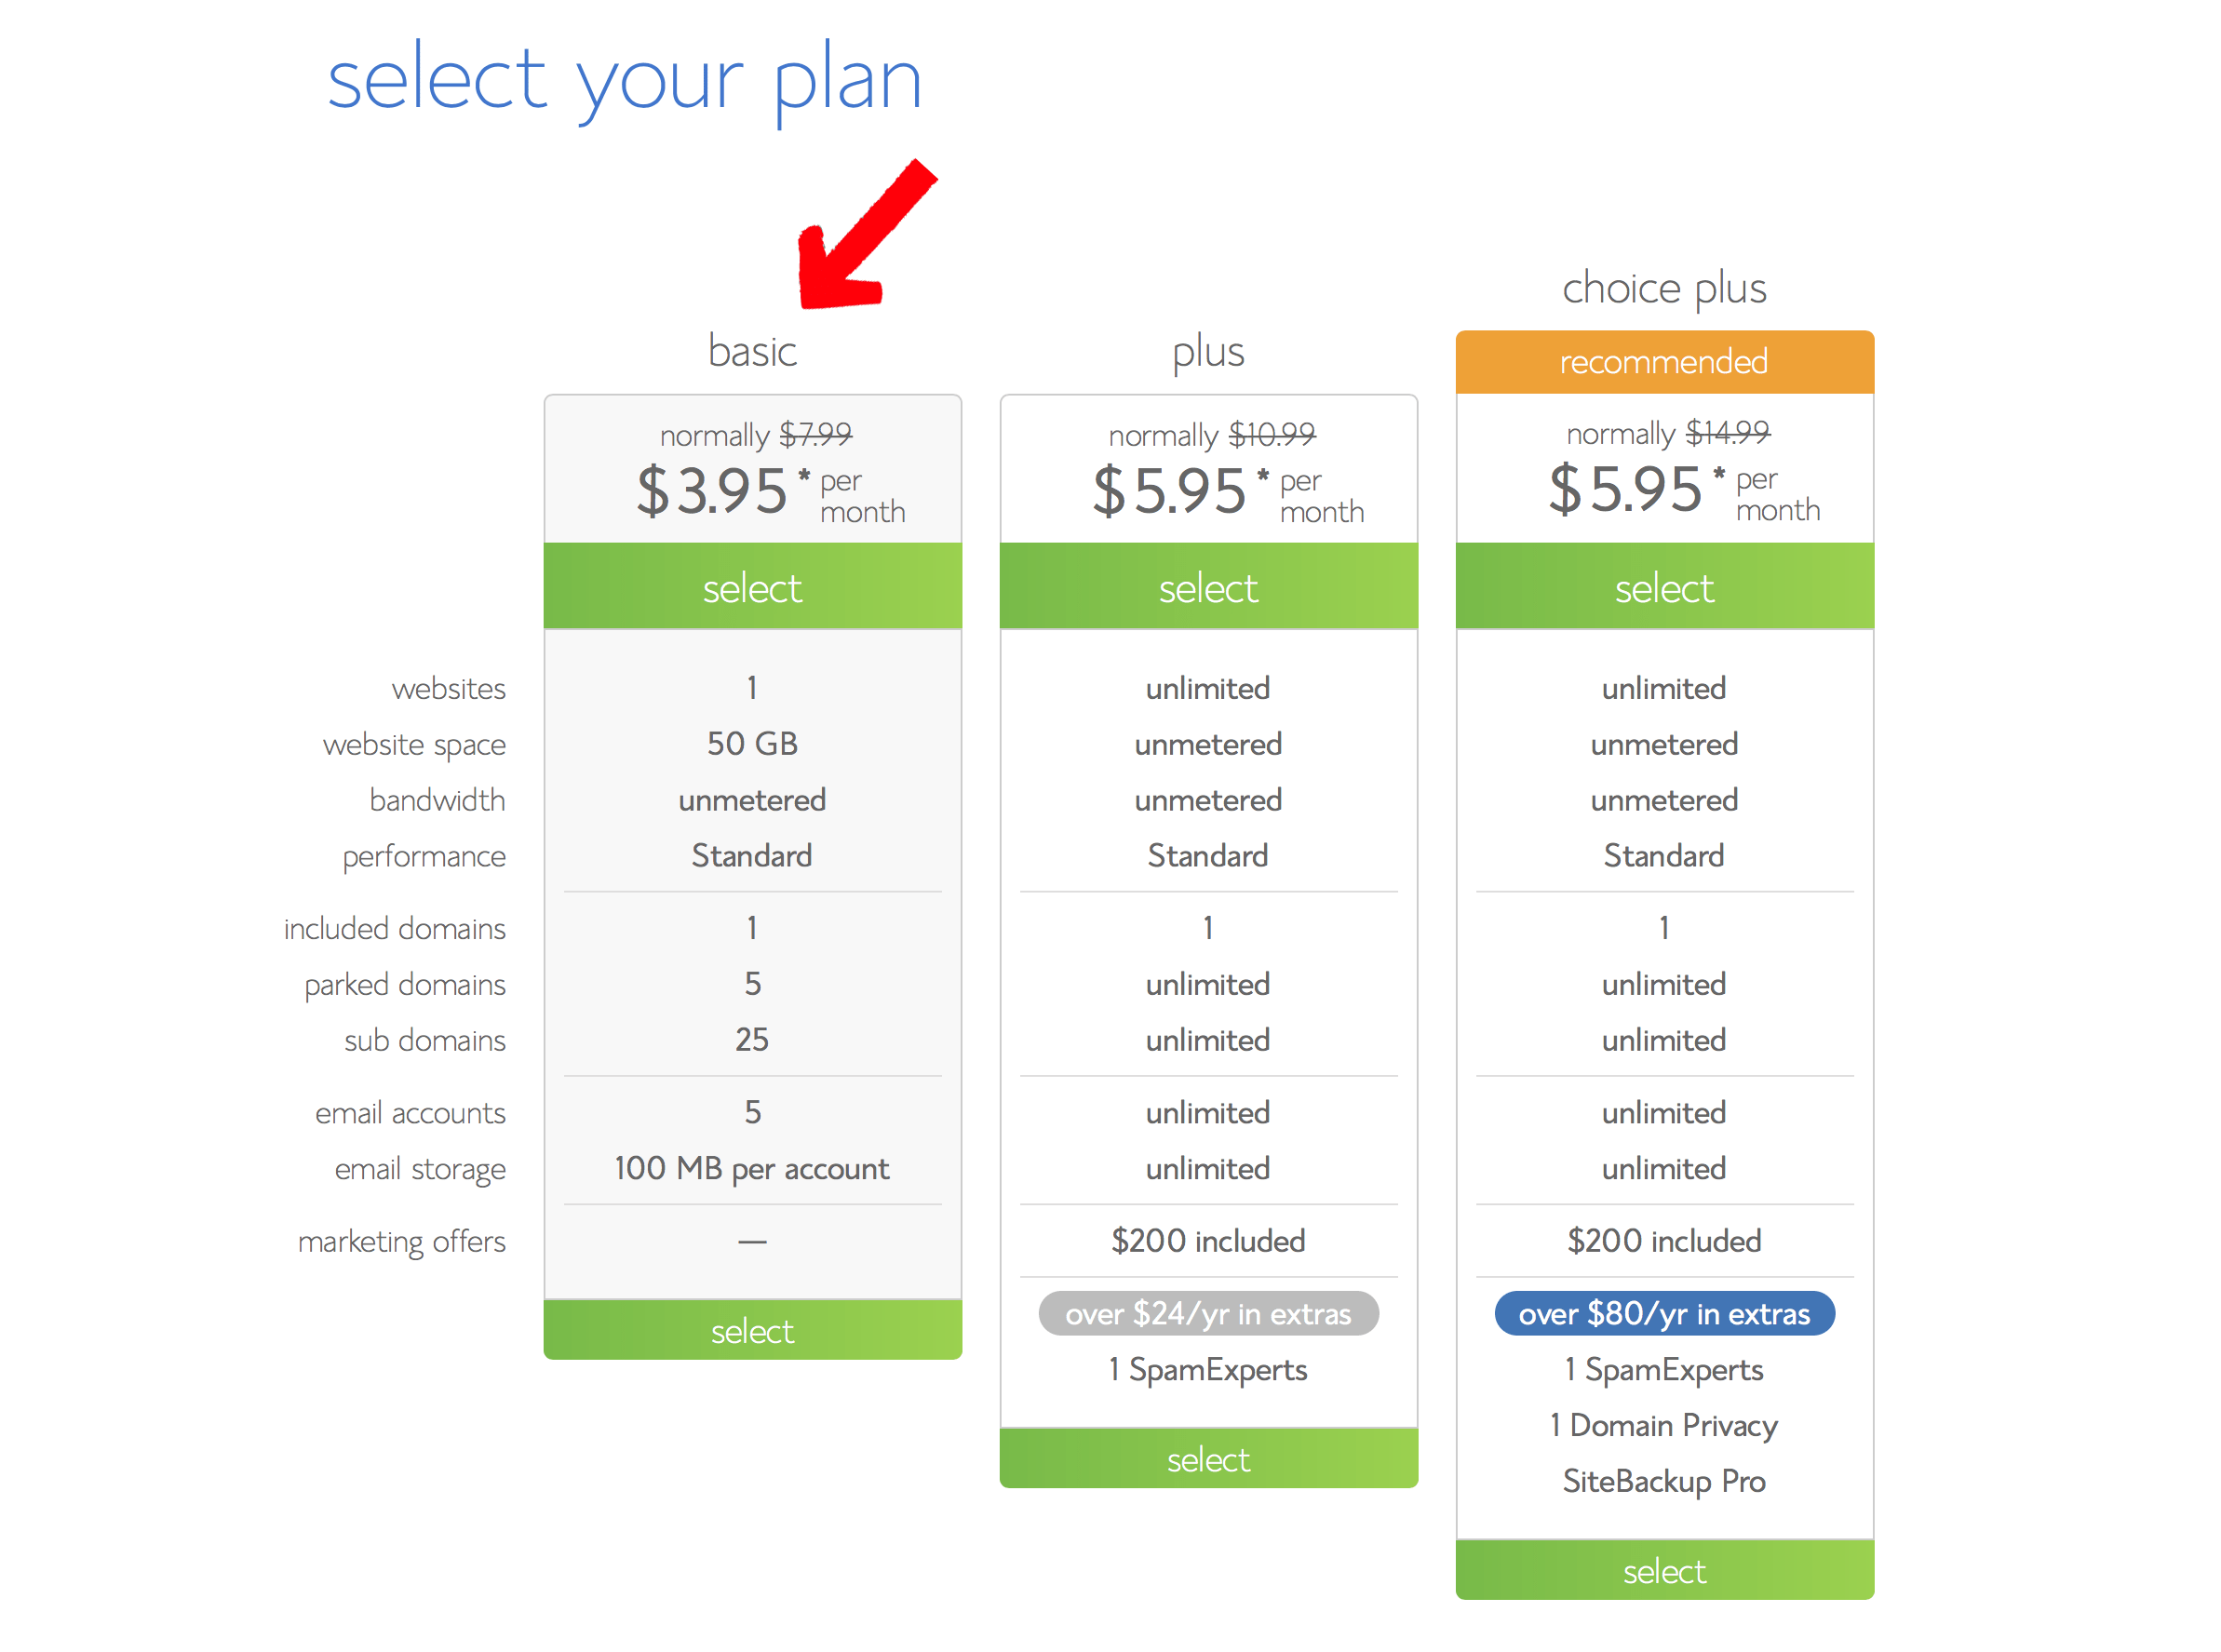
Choose a plan and click "select". For most, the basic plan is all you need. You can always upgrade in the future.
2. Get your domain name
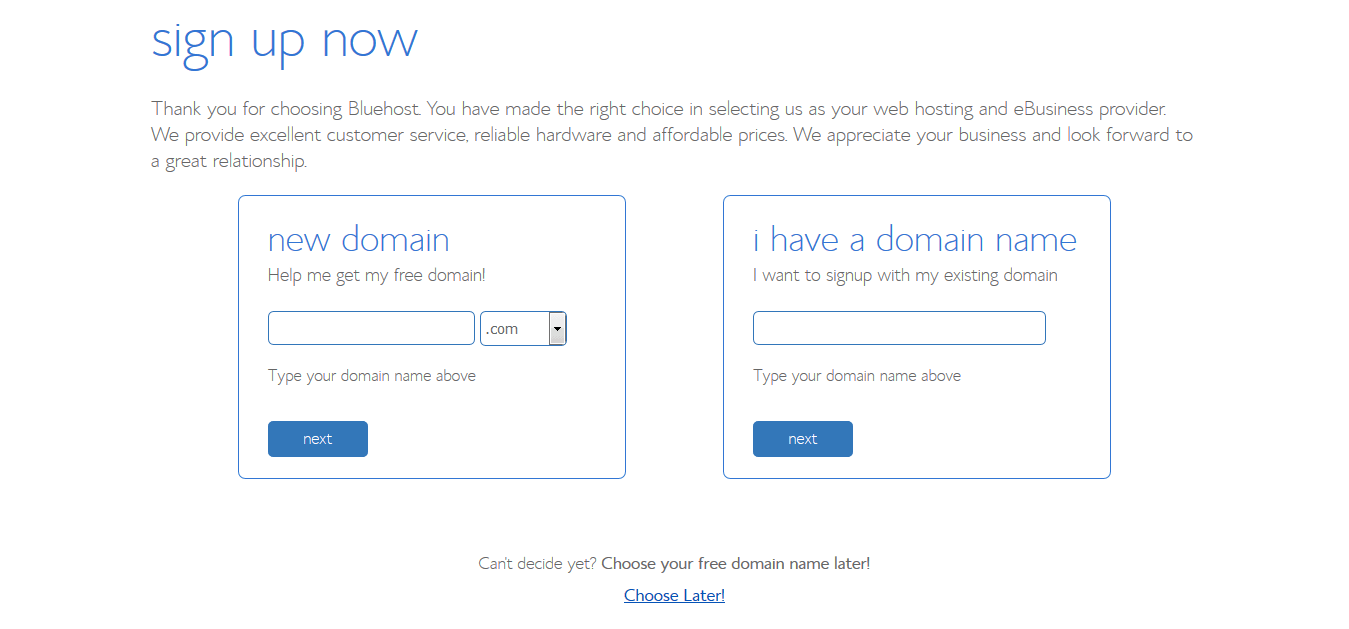
It's time to choose your domain name. This is your address on the Internet. You want to choose your domain name wisely because you can't change it. Choosing your domain name is the hardest part of the process, and once you are past this point, it's easy-breezy. I am going to give you some tips to help you.
Bluehost gives you the option to open your account now and choose a domain name later, but I don't recommend waiting.
I strongly suggest you choose a domain name now and get that out of the way so you can begin blogging today. I think it's important to get your blog going while you are motivated. It becomes easier, quicker.
Here are some tips to help you choose your domain name. If you happen to already own a domain name, you can easily transfer it to Bluehost. Just enter it into the appropriate dialogue box (see image below).
Tips for choosing a good domain name
- Try to keep your domain name as short as you can. I know this can sometimes be a challenge, but try.
- Make sure your domain name is easy to say, and easy to spell. It must pass the "podcast test". If you speak your domain name out loud in a podcast, people should know how to spell it just by hearing it.
- Use a ".com" domain. You have lots of choices these days, and for some people, choosing a different TLD is fine (yeah, that part of the domain is called a "top level domain" or "TLD"). Finding a .com domain that you like will be more of a challenge, but they are easier to remember.
- If your choice is already taken, try adding another word to it. Just make sure that the other word makes sense in your domain name.
3. Create your account
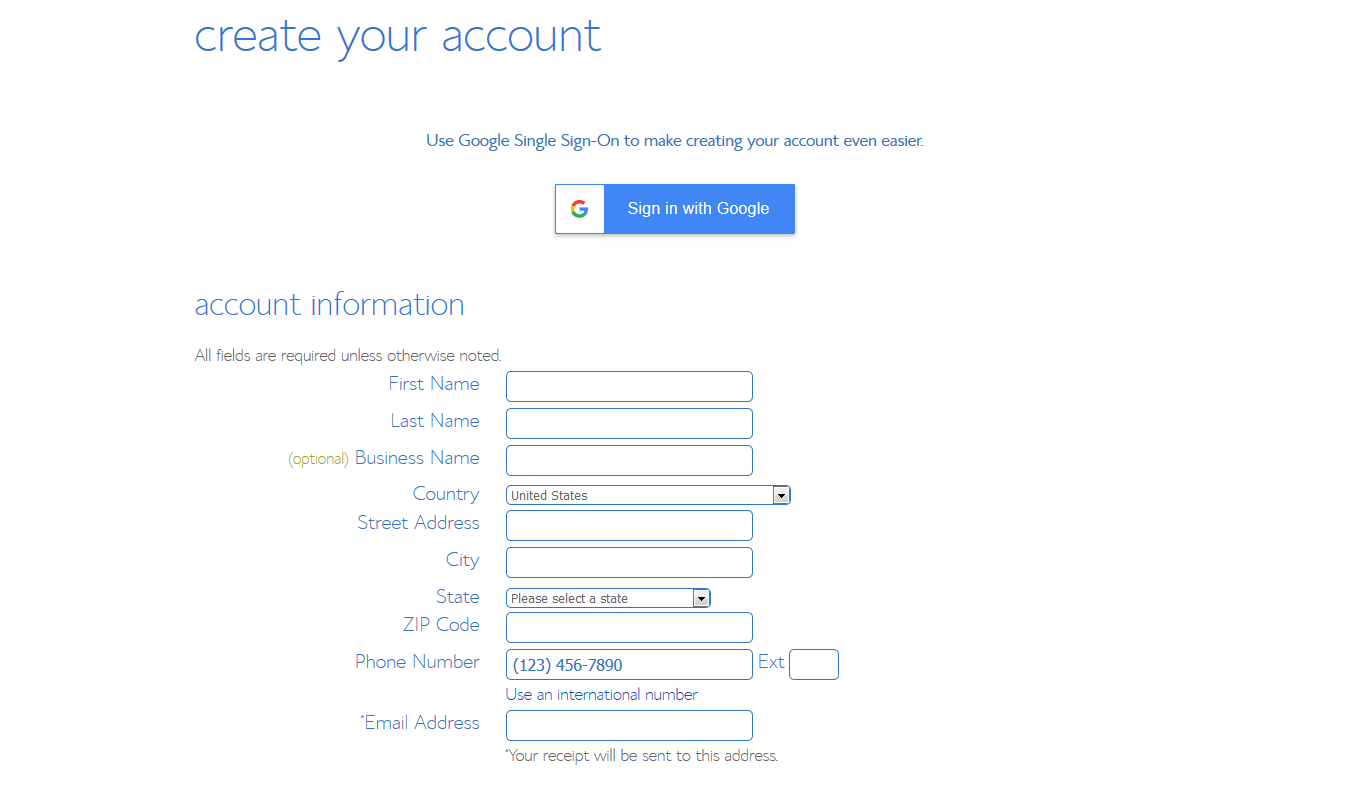
The rest goes pretty quick, so stay with me. You will now be on the "create your account page" as shown below. Just enter your name, address, phone and email as requested, or you can choose to sign in with Google if that is easier for you.
Once your basic info is entered, scroll to the next part to confirm your hosting package.
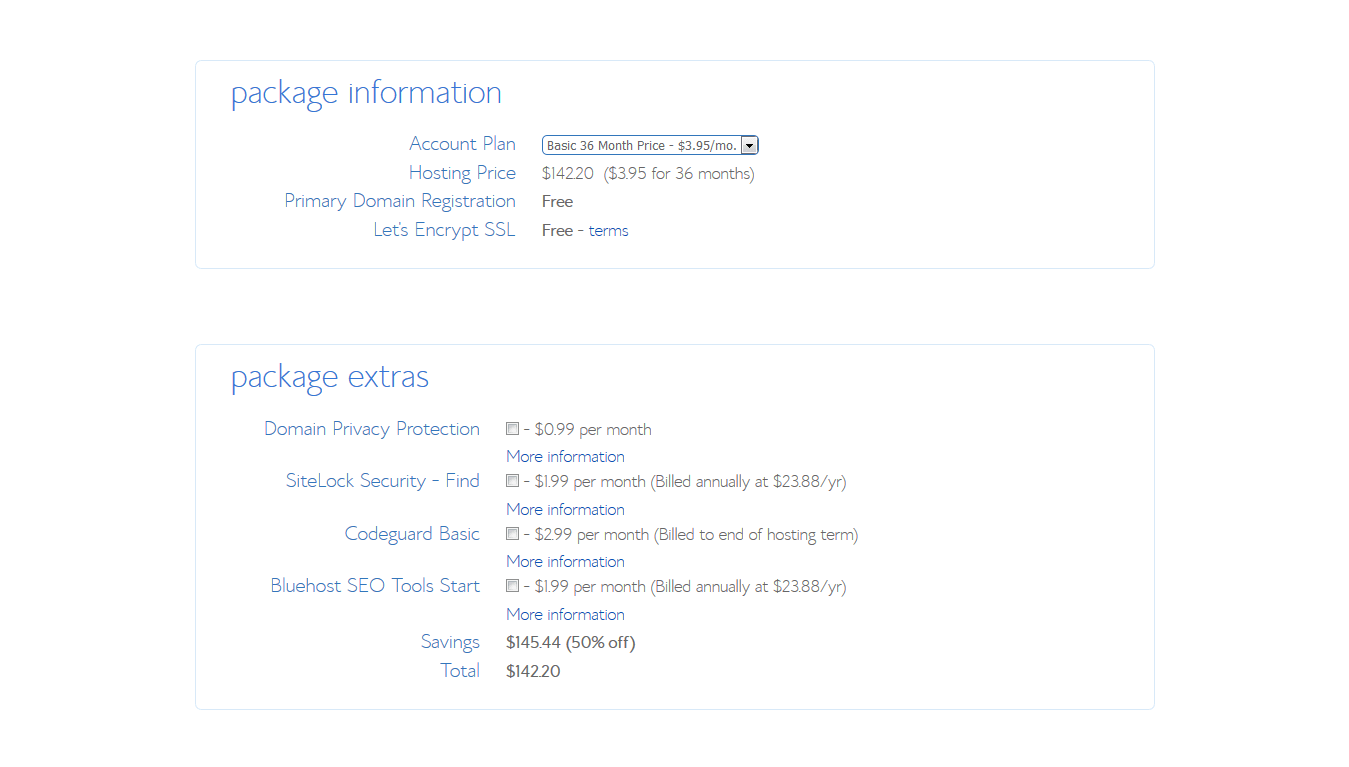
Under package information, the account plan displayed is the one you choose earlier. You can change it if you'd like. The best price is for a 36 month plan. That's good because you don't have to think about it for three years and your price stays locked.
You are then presented with package extras that you may or may not choose. To find out what they mean, jut click "more information". Scroll down to the next section.
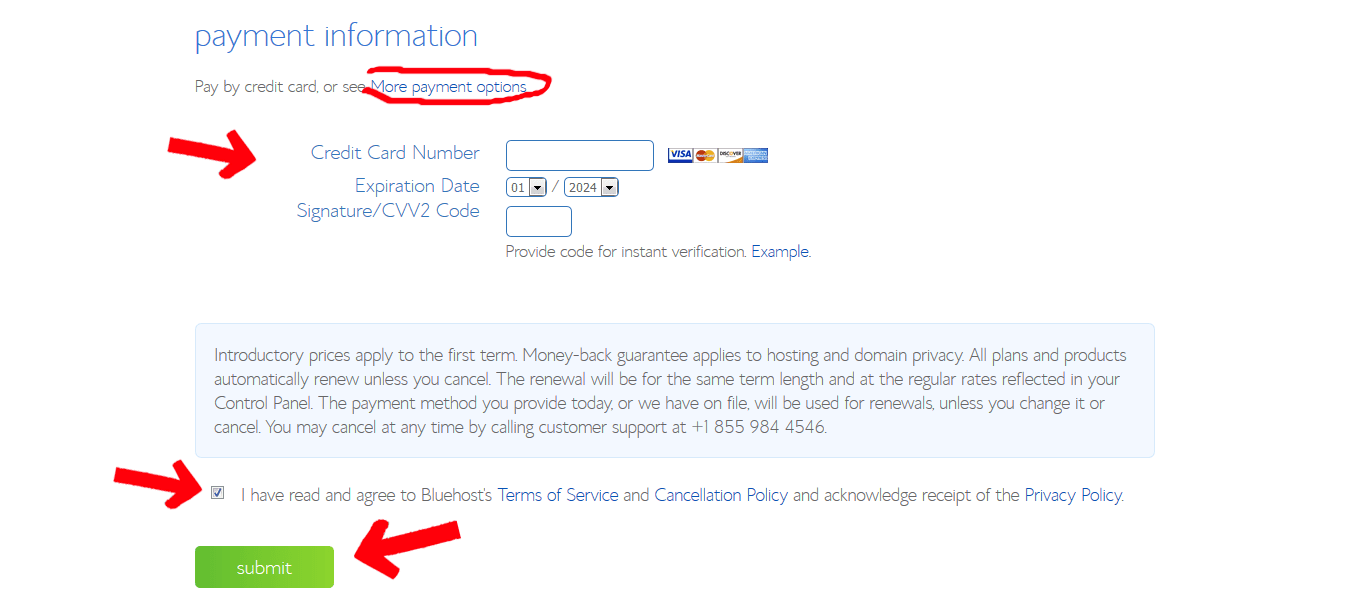
This is where you enter your payment information. You can pay by credit card. If you prefer, you can pay with PayPal. To use PayPal, click "more payment options" (circled in red below).
Once your payment info is entered, confirm that you agree to the terms by checking the box.
Click "submit".
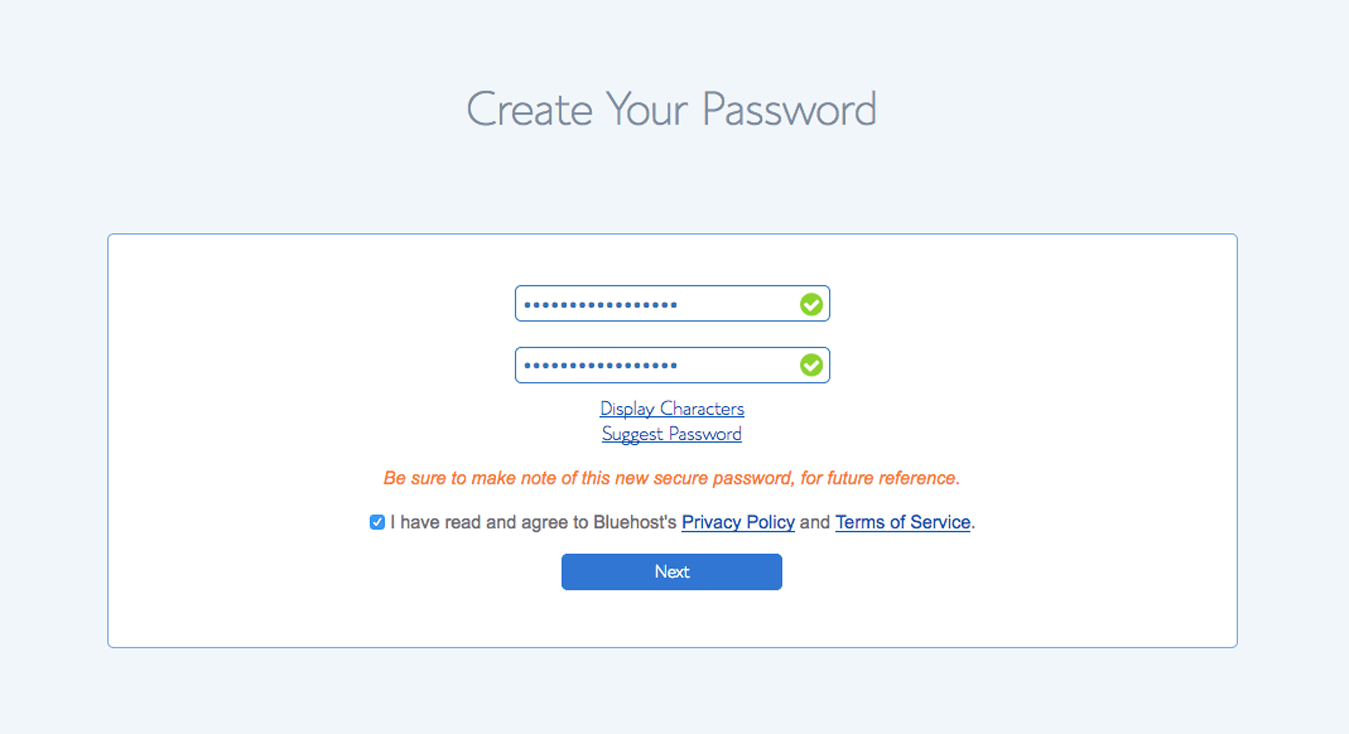
Setting your password is the last step for creating your hosting account. Click "create your password" as shown in the screen below. This will take you to the password creation screen.

You will see the screen below. Create a nice secure password for your account, and make sure you save it somewhere. You will need it to log into your Bluehost account. You will be provided with the necessary login credentials. Be sure to tick the box to confirm you agree to the terms, then click "next".
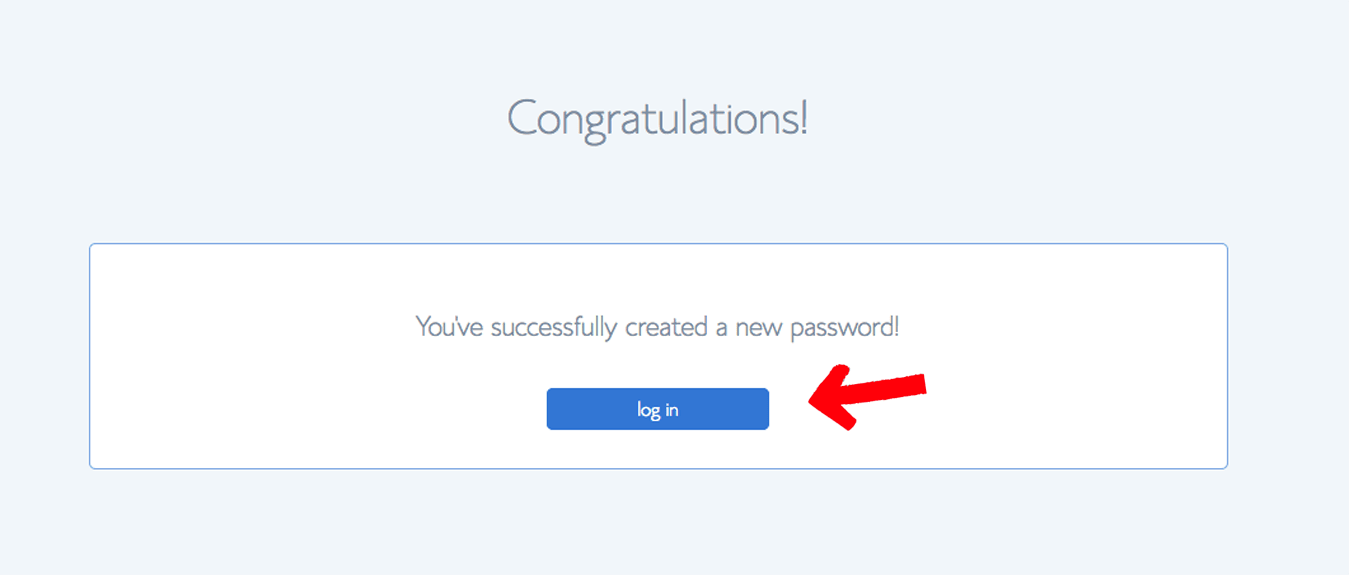
You should now see "Congratulations". This is your confirmation that your hosting account is complete. Now that you have a hosting account, let's get your blog ready. It's easy.
Log into your new Bluehost account by clicking on the "log in" button.
4. Create Your Blog
You are still with me, right? Ok, now it gets more fun. We are going to set up your blog. To set up your blog, we are going to install WordPress on your domain. It's easy, just one click.
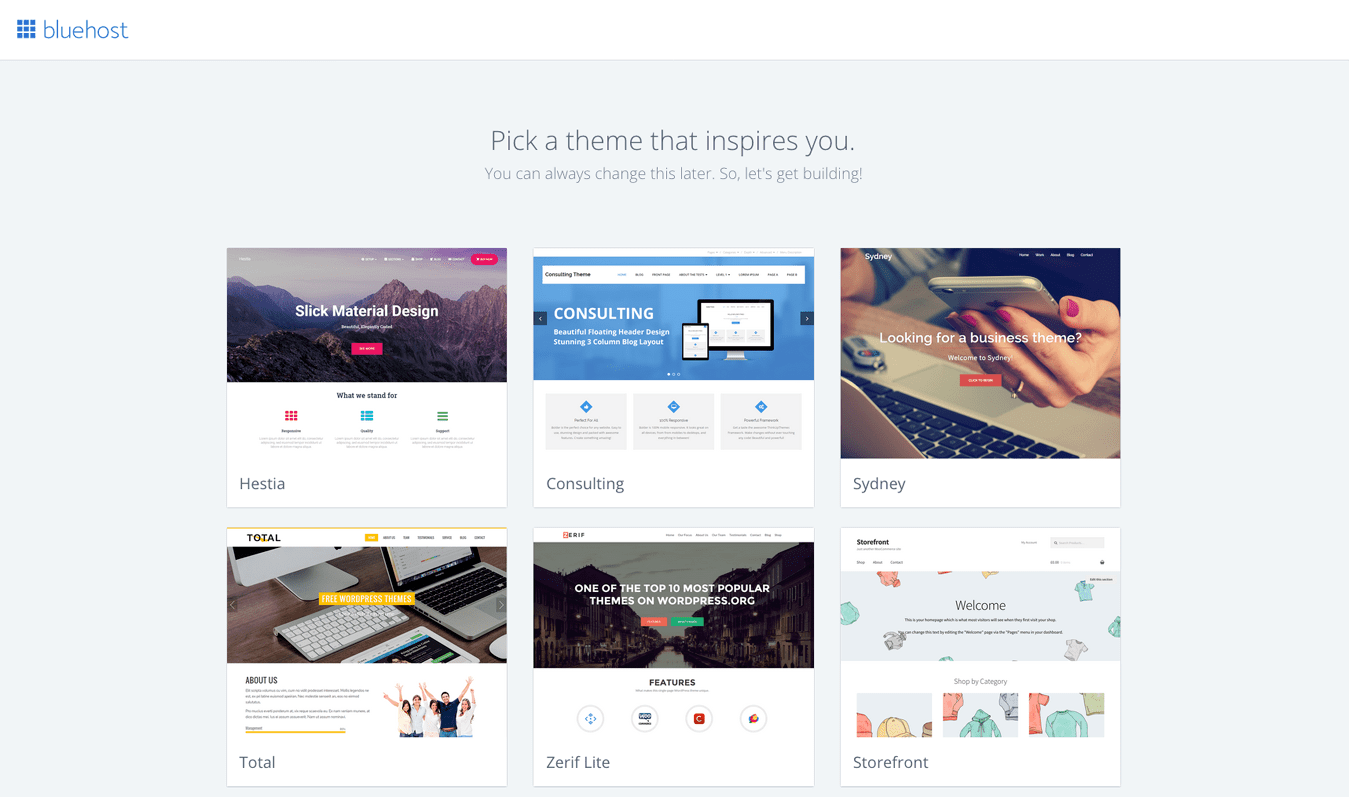
Continuing, you will see a screen to choose a theme. Themes are kind of like templates for WordPress that gives your blog a particular look and feel. Don't fret... just choose any theme for now. It can be changed at any time, even after you have been blogging for a while. We do want to address themes and tailoring your blog to your liking at some point, but now is not the time. It's more important to get blogging.
Choose a theme from the choices provided. Note that the themes provided with WordPress change, so the choices you have may not be the same as what you see in the image below.
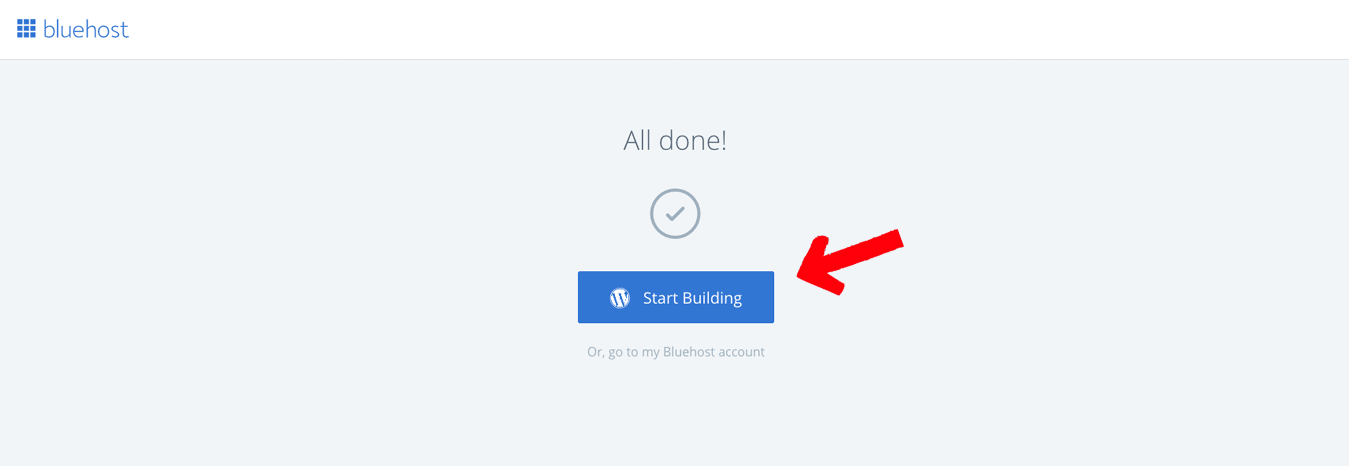
You now have a blog. Let's launch it. Click "start building". See image below.
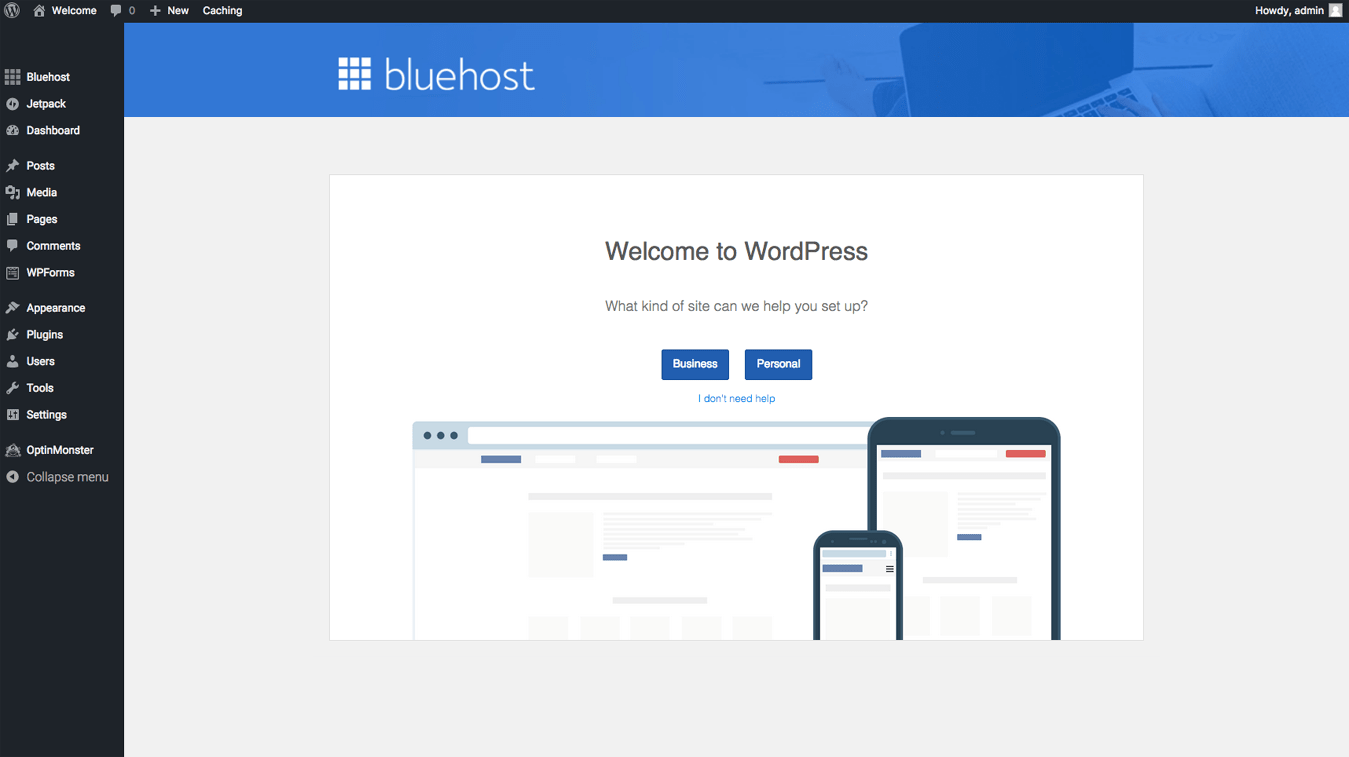
The image below shows your WordPress dashboard. That's a fancy term for the area where you control you blog. Here is where you can adjust settings, create a blog post, and other things. You are going to be spending time in the dashboard, it's good to become familiar with it.
Your blog exists, right now. We are going to do a few basic things and launch it. Launching means to make it visible to the world.
WordPress will ask you if you want to build a "business" or "personal" site. Or you can click on "I don't need help".
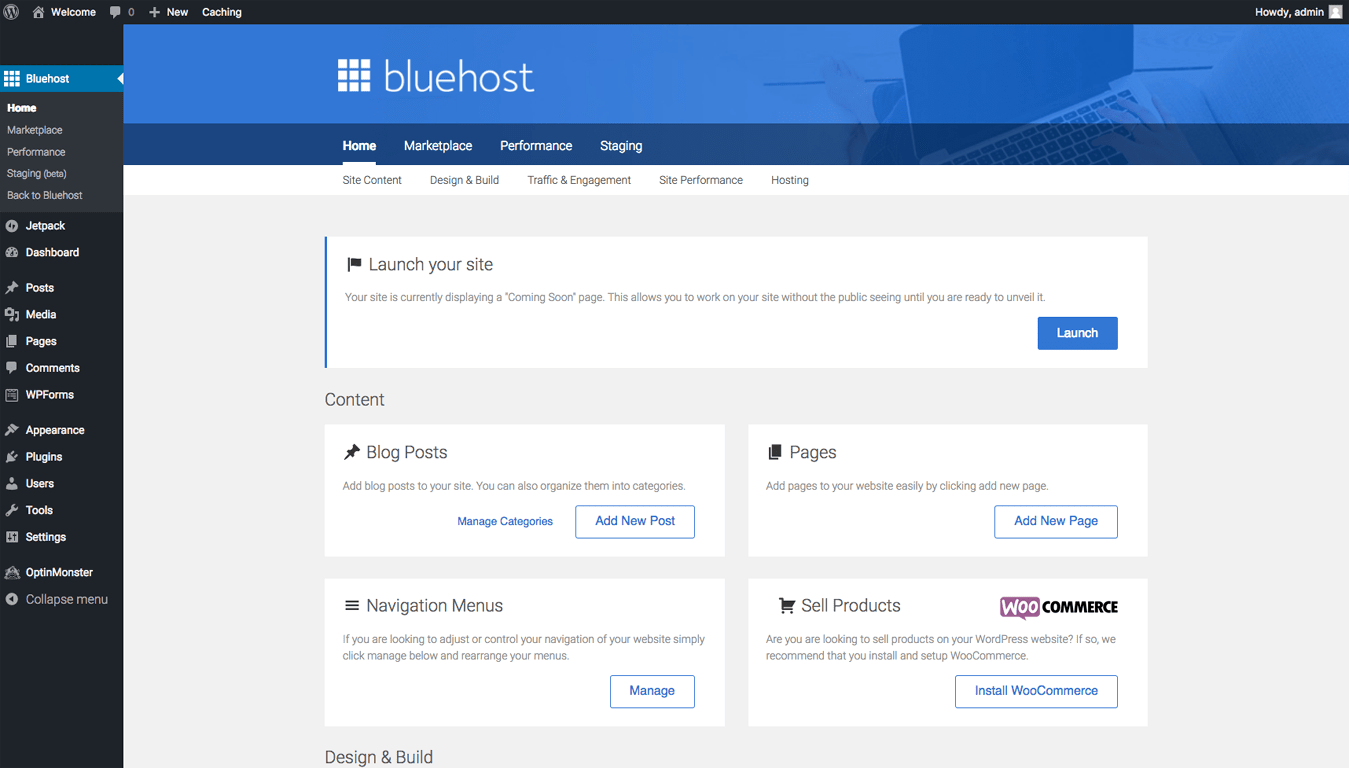
You can launch your site now to see how it looks. It will change once you add a few pages and start blogging. WordPress makes all of that easy.
To get to the launch screen below, click "Bluehost" from the menu on the left. Then click "launch".
You will be asked to add the name of your site and a tag line (site description) if you have one. Don't worry, you can change these later by clicking on "settings".
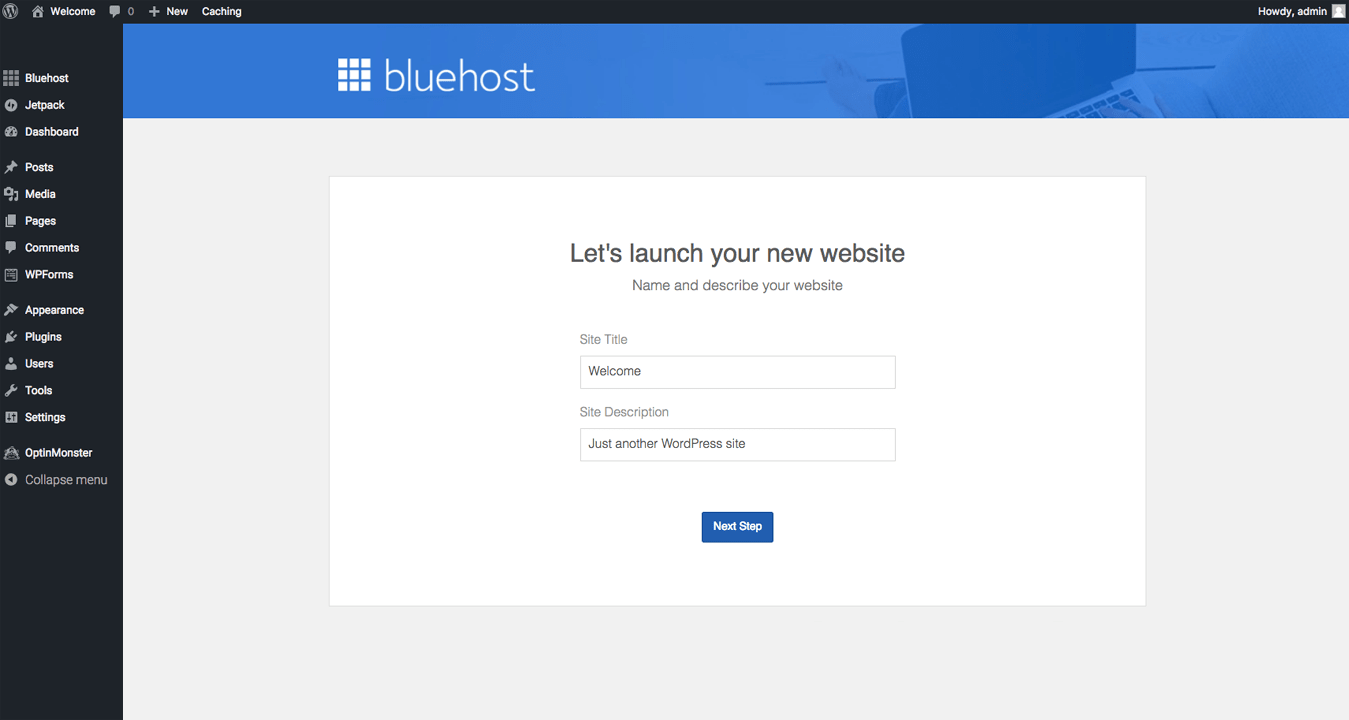
Your website (blog) is now online and visible to the world. But don't go away, I am going to walk you through one more thing that is very important, and it only takes a minute.
5. Set your link structure
We will be done in one minute. I want to help you set the format of your links. This is important because every time you make a blog post, WordPress creates a unique link to that post. You want to tell WordPress how to structure your links so they help bring traffic to your blog. Once you start blogging, you don't ever want to change your links, so we need to set this up right now.
Do This Right Now
We are going to change what is called a “permalink”. A permalink is a structure that WordPress uses to generate links for your posts. It’s called a permalink for a reason… it is intended to be permanent. WordPress allows you to change it at any time, but you do not want to do that once it is set.
Here are the steps to set your permalinks
- Log into the dashboard of your blog (if you are not already there)
- On the left side, go to “Settings” > “Permalinks”
- You will now be on a page called Permalink Settings
- Under “Common Settings” you will see that “Plain” is set by default
- Change that setting to “Post name”
- Click “Save Changes” and you are done
Congratulations, you now have a blog! (fist bump)
If there is anything that you need, let me know. I'm here to teach you how to do it right. I cannot do it for you, but I can guide you. Bluehost has great support if you are experiencing difficulty. Remember, there is a learning curve, but it is well worth it - and fun too. It's your job to produce quality content that provides value to other people (you get out what you put in). If you do that, you are well on your way to success. You are also going to want to refine your blog design (colors, images, logos, etc.). You will begin to see the power of WordPress as you build out your blog. But before you start changing the look of your blog, start writing. That's far more important.
I'd like to personally congratulate you! You have taken an import step for a better life. Now remember what I've been telling you... this is just the beginning. Time to move to the next part... creating content. Commit to your blog... you get out what you put in. If you don't find posts on what you need next, ask me and I will make the and answer your questions.
You can do this yourself. I know you can, but if you are unsure, you can still get your blog started with this professional course.
If you found this article helpful, may I ask if you can help out by sharing it? It would mean the world to me. Thank you.
Resources
Pro Blogger Resources
- Pro Blogger Training (all-inclusive)
- Self-hosted blog platform for bloggers (with Bluehost)
- Bloggers best email list management (with ConvertKit)
Do you have questions about setting it up? Ask me in the comments below. If you have a success story you want to share, that would be cool too!
- My Ecommerce Story Part 2 – Launching - April 28, 2020
- I’m Building An Ecommerce Store – Part 1 - April 13, 2020
- What Is A Self-Hosted Blog? - November 15, 2019
The retail store analogy is simply superb to make it easier for everyone understand things better… when doing virtual online business, I agree to your view on trustworthiness of the person who is selling rather than the product itself!
Thanks Velumani, I am pleased you found my analogy helpful. I use analogies often because they are so relatable to what we already understand.,