Installing plugins are simple and easy, but you still need to learn how to install them.
Installing a plugin is easy, and there are three ways you can do it. Plugins enhance the functionality of your website and are necessary to get the most out of WordPress. This is part 2 of a 3 part series on plugins. Go here if you missed the first part.
To install plugins for WordPress, you must be running a self-hosted website/blog. Free hosting platforms do not allows you to install plugins. If you have not already started your self-hosted blog, go here to learn how.
Let’s install a plugin!
You’ll need to choose a plugin to install. On the next part of this 3 part series, I am going to suggest a few plugins to install. For now, lets say you want to install a plugin to help with SEO.
There are many plugins available for SEO. I use the Yoast SEO plugin and I do recommend it, but you are free to choose another if you know how to use it and you know it works well. Yoast SEO is a free plugin that also offers a premium (paid) option. As a beginner, the free version is probably fine for your needs. Let’s install it.
There are three ways to install a plugin
- Method 1: Using the search function in your WordPress dashboard
- Method 2: Uploading the plugin from your WordPress dashboard
- Method 3: Using FTP to copy the plugin files to your host server
If you are a beginner or you are not technical, you are going to want to use method 1 or 2.
Method 1: Install a plugin from the search function
The easiest way to install a WordPress plugin is to use the plugin search function from your dashboard. This is not always ideal though, because premium (paid) plugins are not going to come up in that search. Note that some plugins have a free version with a premium upgrade, which can be found in the search.
Steps to install a plugin using method 1
- Log into your WordPress dashboard.
- On the left side, click on “Plugins”.
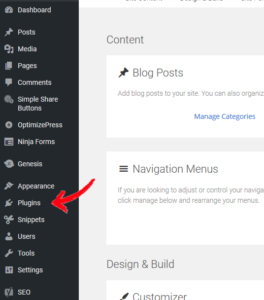
- You should now be on the “Plugins” screen and you will see a list of installed plugins. There will be some plugins already there because they are preloaded with your fresh WordPress installation.
- At the top of the screen, click on “Add New”.
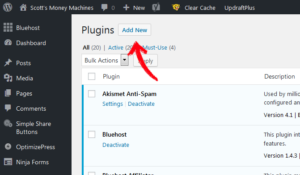
- You should now be on the “Add Plugins” screen.
- On the right side, near the top, there is a search window that reads “Search plugins…”.
- Type “yoast” (without the quotes) into that search box.
- You will see a bunch of plugin choices that come up from the keyword you typed.
- We are going to choose the plugin called “Yoast SEO” (by Team Yoast). It should come up first, or very close to it. You will also notice other similarly named plugins, some from the same company/author.
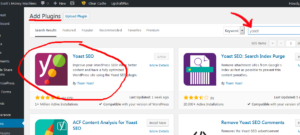
- Click “Install Now” for that plugin. You will notice in the image I provided it says “Active” instead of install now. That’s because I already have the plugin installed and running.
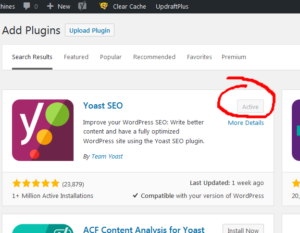
- Installation should only take a few seconds. After it is installed, the button will now say “Activate”.
- Click activate. Activation takes a second or two, and it will then read “Active”.
That’s all there is to installing a plugin from the search bar. Many plugins (perhaps even most) require setup or configuration, so there may still be things to do to get that plugin to function as desired. Some plugins are quick and easy to setup, others require some time.
Method 2: Install the plugin by uploading it
This is very similar to the above method and is the second easiest way to install a plugin. The difference is that you would already need to have the plugin to use this method. So if you purchased a premium plugin and downloaded to your computer, this would be a good way to install it. You can also install a free plugin this way, if you already have it.
When you download a plugin, it will be in a single zip file. Do not unzip that file. When you install it, you just upload that zip and let WordPress do the rest. It’s that easy. Here’s how to do it.
Steps to install a plugin using method 2
(Reference the images from method 1 for the first 5 steps)
- Log into your WordPress dashboard.
- On the left side, click on “Plugins”.
- You should now be on the “Plugins” screen and you will see a list of installed plugins. There will be some because they are preloaded with your fresh WordPress installation.
- At the top of the screen, click on “Add New”.
- You should now be on the “Add Plugins” screen.
- At the top, click on “Upload Plugin”.
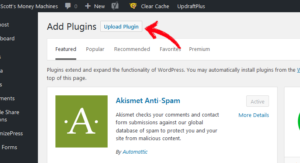
- You will then be able to locate the file on your computer using the “browse” button. Click browse, find and choose the file, click open.
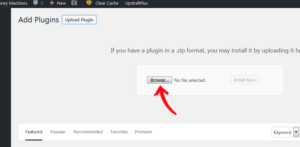
- Click “Install Now”.
- Activate the plugin.
That’s all there is to installing a plugin by uploading it.
Method 3: Install the plugin using FTP
FTP means “file transfer protocol” and refers to using an FTP application (known as an FTP client) to upload the files directly to your server (your host server). This is a bit more technical than the other methods, and should only be used if you do not have the ability to use the above method. You would want to use this method if you have file restrictions.
Similar to method 2, installing this way requires that you already have your plugin zip file. However, you will need to unzip them yourself since WordPress is not doing the install for you.
Steps to install a plugin using method 3
Note: If you are unsure of what you are doing, I would suggest you have someone else handle it for you.
- On your computer, find the plugin zip file.
- Extract (unzip) the file. You will notice that this creates a new folder with the same name. The files for the plugin are located in that folder. Do not alter the folder or the files in it. You are going to upload that entire folder to your host once you are connected (see below).
- Launch your FTP client. You can use any that work for you (I use FileZilla).
- Log into your server on your host with the credentials that were provided to your by your host (such as Bluehost). If you do not know your credentials, contact your host and ask them.
- Once you are connected to your host using your FTP client, you will have access to the files for your website.
- On the server side (the remote site), find the folder for your website.
- From within that folder, find the folder called “wp-content”.
- From within that folder, find the folder called “plugins”.
- Highlight the plugins folder. This is where you are going to upload to.
- Locate your computer files from within the FTP client (the local site) and find the folder that contains your plugin.
- Highlight this folder. Then right-click and choose upload. Your FTP client might be slightly different, but it will be generally the same. Uploading is going to copy this entire folder from your computer to the highlighted folder on your host.
- When complete, the plugin files should now be loaded on your website.
- You still have another step to do.
- Log in to your WordPress dashboard (your website dashboard).
- On the left side, click on “Plugins”.
- You should now be on the “Plugins” screen and you will see a list of installed plugins.
- Find the plugin you installed, and click on “activate”.
- Your plugin should now be activated.
Plugin installed!
Any of the above three methods will work to install a plugin. Options 1 and 2 are quick and easy. Option 3 requires more technical experience, and should not be needed in most cases.
Now that you know how to install plugins, let’s move on to the final part of this series where I am going to suggest a few key plugins to help secure your blog. Go to Part 3 – Essential Plugins for security.
(If you the missed the previous part, you can go back: Part 1 – What Are Plugins?)
I welcome your questions… You cane leave them in the comment section below
- My Ecommerce Story Part 2 – Launching - April 28, 2020
- I’m Building An Ecommerce Store – Part 1 - April 13, 2020
- What Is A Self-Hosted Blog? - November 15, 2019